Shopping for Off-Road Lights: A Buying Guide
Lighting may just be the most saturated category in the off-road aftermarket. For Joe Consumer, that’s a great thing, as it means plenty of styles, price points, and form-factors to choose from. Unfortunately, that power of selection makes choosing a lighting setup a bit of a daunting task – even for something as simple as a little more visibility for nighttime wheeling. To help clear the clutter, The Engine Block has compiled a few things you need to consider when light shopping. We can’t pick for you, but we sure can shine a spotlight or two on what to look for!
Pod or Bar?
This is an age-old debate, or at least one that’s raged since light bars came to prominence a few decades ago. While light bars are a popular modern choice for a rig, there will always be those who prefer the classic look of round or square stand-alone lights.
Pod
A pod is just the term for an individual lamp contained within its own housing. Pods are usually round or square—but can come in a few other general shapes. They can be had in various diameters, but you’ll find most fall within the 3”-7” range. Since they’re compact, they can be mounted just about anywhere a bracket fits—from bumpers to roof racks, and cowls to grilles. Pods are a versatile choice, and while the beam may not be as wide as a comparable light bar, many pod mounting solutions can be tilted and swiveled so you can really dial in where you want your light to be pointed.

Light Bar
A light bar is a unit that houses several separate lamps within one long, rectangular unit. Common sizes range from 10” to 60”, though they can be smaller. Light bars typically come in single or double-row configurations. Typically, they are mounted on roofs, just above the windshield, as well as in bumpers outfitted with bar cutouts. Since light bars are only a couple inches tall at most, they won’t increase the height of your vehicle, but their long, slim, design leaves only a few common spots to mount.
The ultimate decision will be based on what brackets, mounting solutions, or cutouts you have available—but we’ll touch upon that later.
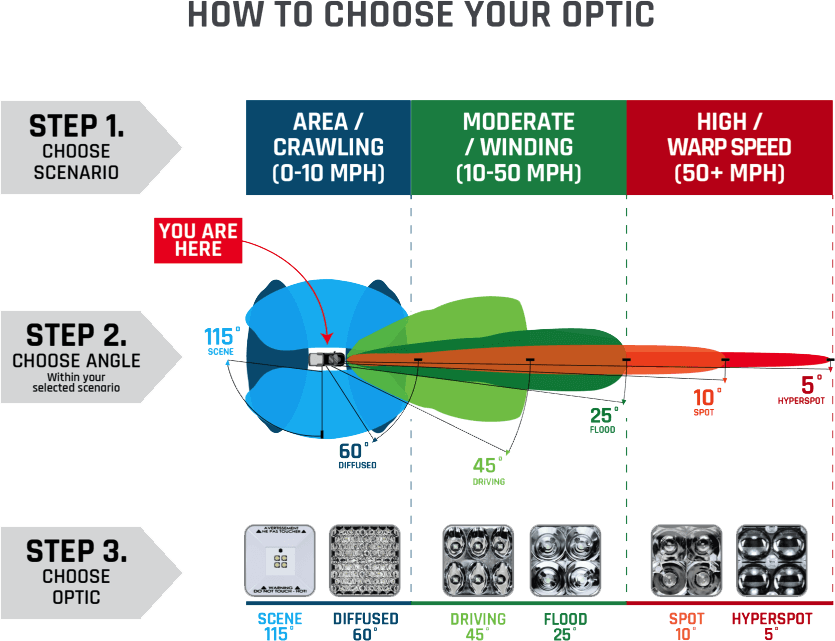
Beam Pattern
While the form-factor of your lighting is important, perhaps the most crucial decision to make is what beam pattern you require.
For this, a visual can say more than we can put into words—so just take a look at this handy optic chart.

As noted by the heading, the largest factor in making this decision is the speed at which you’ll mostly be driving when these lights are in use. The faster you plan to go, the farther in the distance you’ll want to illuminate. For slower wheeling and crawling, diffused and driving lights will throw a wider pattern on what is immediately in front of the vehicle. If you’re blasting over dunes, or participating in the Mint 400, we wish you luck, and you’ll probably want some spot lighting to brighten up what’s off in the distance.
But with all the lighting and mounting options available, why not mix and match? Nothing is stopping you from equipping your rig with wide, shallow lighting for those nighttime crawls, as well as penetrating spot lighting to see any hazards that may lie deep down the trail.
Halogen vs. HID vs. LED
Lighting has come a long way in the past 30 years. The industry is at a point in time where “older” lighting technology—halogen—still exists, but with constant improvement it looks and performs miles ahead of where it was decades ago. Plus, new and exciting sources landed on scene too: HID and LED. These technologies work great and continue to evolve and come down in price.
But that still leaves the question—what is best for you?

There are many resources available that can explain the engineering of these three choices with exacting detail.
So, without diving into tech-speak, here are a few bullet points to reference about each style:
Halogen
- Oldest and most ‘dated’ tech, but by far the least expensive
- Higher wattage means brighter, but it also means more power consumption
- Running multiple mid-high wattage halogens may require an upgrade to the electrical system
- Requires heavy gauge wiring and relays to ensure maximum safety and performance
- Often cost well under $100
HID/Xenon

- On average, 2.5x more powerful than halogen, with a larger throw
- Typically a ‘whiter’ light than halogen
- Operate with about 60% less current than halogen
- While timing may vary, HID tend to take a bit of time to light up
- Depending on housing material and quality, range from $100-$400
LED
- Typically the most compact, durable, longest lasting, and efficient
- Superior shock and water resistance
- Can operate well on many voltages without need for electrical upgrades
- With a 5-6K temperature, LED generally produces the brightest white
- If seeking style over substance, many cheap Chinese LED bars can be had for under $100
- Quality, high performing LED bars can cost well over $1,000
- Look for CREE LEDs, if performance is paramount
- While long lasting, a dead LED leaves an unsightly hole in a bar. Think: Christmas Lights
Light Mounting Position
Another thing to consider is where the lights will mount. Each common position has pros and cons, in addition to different installation and wiring methods. While there may only be one place to practically mount your 60” light bar, you’ll have to make a choice when going for smaller bars and pods.
Here are three of the more common positions:
Roof Above Windshield
A classic tried-and-true option is right above the windshield. This can be super convenient if you already have a factory rack or wind deflector that comes equipped with mounting locations. This position also has the farthest height-level difference from the headlights, offering greater potential to illuminate the most area in front of you. But while it is a functional spot that can accommodate a wide variety of bar and pod configurations – and arguably looks the most badass – wiring will prove the most difficult. It usually comes with drilling and/or routing under weather stripping, so if you don’t do it properly, water will find its way inside your cabin.

Windshield Pillar/Cowl
While not as common as the roof or bumper, cowl lights are a great option as they throw light right around the driver’s eye-level. One benefit of cowl lighting is that in many situations (if your setup allows) it can potentially be the only spot where a light can be manually shifted by reaching out of the window. Cowl lights usually consist of one pod at either corner of the windshield, although you can also mount a bar in the rear-center of the hood right before it meets the windshield. Of course, this isn’t the best idea if you find it overly obstructs your vision or wiper functionality. Cowl lighting will require some kind of bracket to install, so be sure to budget for that.
Bumper
Perhaps the most common and simplest choice for mounting is the bumper. When installing lights in and on top of the bumper—as well as on the grille—you’ll need very little wire to reach under the hood. And since there are many open pathways to get there, you likely won’t need to remove any trim or weather stripping to do so. An aftermarket bumper with cutouts makes lighting choice and mounting even easier. However, many 4x4s will feature mounting holes in the stock bumper as well. (Even if they don’t, this will be probably the easiest and least anxiety-inducing place to drill.)
Whatever you choose and wherever you decide to put it, the importance of a solid mounting solution cannot be understated. No one wants to drop a thousand bucks on a sweet light bar only to have the bracket and tubing fit poorly and rattle like a diamondback. A cheap mount will reduce the longevity and functionality of the lights.
Be sure to consult your local laws and regulations before mounting any lighting accessory to your vehicle.
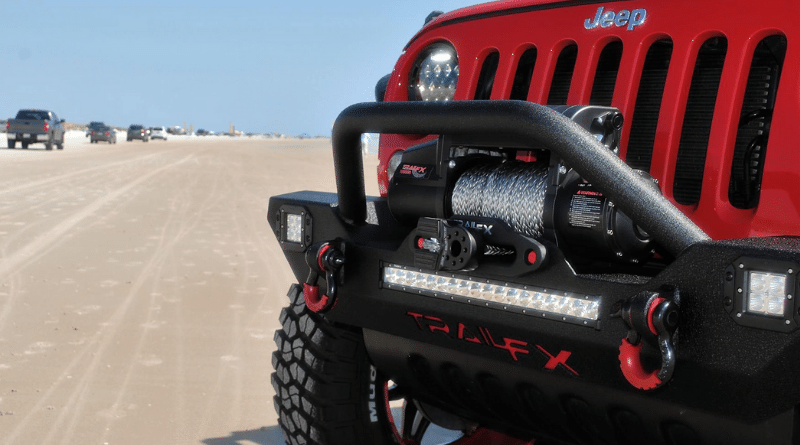
Looking for an upgrade? With a solid lineup of single and double-row light bars, work lights, cube lights, and more, TrailFX lighting solutions add value and performance — without breaking the bank. Visit www.trailfx.com to learn more.


